In a perfect world, we’d love to start any homemade recording studio tutorial with a link to the best pre-built voiceover home studio around (ahem) and let that be it. But the world isn’t perfect and when it comes to starting off your voiceover career, it’s all about getting your hands dirty and working with what you’ve got.
So in this “how to build home studio” guide, let’s tackle one of the most important features that any new voice artist needs to get started on: building a home studio.
But instead of just telling you to build a booth, let’s assume that you don’t have the room to simply construct a fully stocked voiceover home studio right in the middle of your house. Instead, we’ll be getting our hands dirty and discovering how to turn a room into a recording studio so that you can start producing quality voice work.
So follow these instructions and you’ll learn how to build a studio in your room / cupboard / basement / anywhere you need it to go really.
Where Should I Put My Homemade Recording Studio?
Unlike simply buying a booth or building one from scratch, a viable method for fitting a home studio into your home is to simply take a space and retrofit it as a DIY voice over studio. Now clearly, this isn’t the optimum option. There’s a reason why the best recording studios are specially built facilities and not hosted in someone’s cupboard.
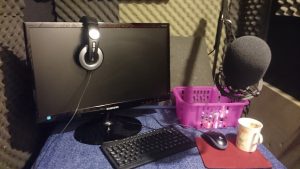
But for the purposes of a voiceover who is starting out in the industry and simply wants to produce good quality sounding audio with the aim of producing a demo reel or getting their first work, building a home studio is a good workaround.
It may also be your only option if you’re renting a place or your space is limited since you don’t want a homemade recording studio taking up what little room you have and a few la
ndlords might not take kindly to you learning how to turn a room into a recording studio and then completely tearing up the place.
The first thing to focus on is finding a good spot for your new voiceover home studio. To do that, we must first understand what we want our homemade recording studio to achieve and then we can discover how to build a studio room that actually does what you need it to do.
Not a reader? Watch our webinar about how to build a studio room!
How To Build Home Studio Environments That Actually Work?
From a professional studio to a home booth, to your own cupboard based homemade recording studio, the goal is always the same:
We want to achieve a space where we can capture appropriately loud, clean and noise free, high-quality vocal recordings with no sound reflections.
In simple terms, we just want your voice to be the right volume (we have a good example of this in our webinar), be captured by a good quality microphone and for there to be no extra noises to ruin your recordings.
To do this we need to do 4 things:
Prevent Sound Ingress – Stop sound coming in from outside e.g neighbours, traffic e.t.c.
Prevent Sound Egress – Stop sound going out e.g. so you don’t annoy people you live with (but this is less important depending on how anti-social you are)
Prevent Sound Reflections – Stop sound bouncing back into the microphone off hard surfaces
Create A Stable, Repeatable Environment – Every time we record, we want it to sound the same each and every time.
How Much Does Building A Homemade Recording Studio Cost?
This is an open ended question as it can range from a few hundred pounds to thousands depending on the materials you use and the equipment you bring into your voiceover home studio once it’s complete.
The good news is a DIY voice over studio can be built on a tight budget if you need it to be a lesser expense, which is recommended for those starting out.
While the materials to create your homemade recording studio can be pricey, there are cheaper budget alternatives. Your largest expense will be the actual recording equipment, but thankfully, high quality recording equipment has become drastically cheaper over the last decade and even better, there are also many free alternatives when it comes to your editing and post production software.
We’ll walk you through the materials in our 4 steps, but the big expenses that you’ll find will be:
- Acoustic Treatments (Stop sound reflections)
- Home Studio Soundproofing (Keep sounds out/in)
- Recording equipment (mics / stand / pop shield / laptop / monitor)
- Editing software
These are all the key materials you’ll ever need to focus on when building a home studio.
What Are The Benefits of A Homemade Recording Studio?
Having a homemade recording studio is a great way to be able to consistently and reliably produce high quality voiceover recordings whenever you need them, for a percentage of the cost of using a rented out studio.
But for anyone who’s on the fence, or isn’t sure if they should just buy an expensive VO booth or just sit under a blanket, here’s 5 quick and simple reasons why you should learn how to build a studio room instead:
1 – It’s the perfect entry point for anyone who wants to start producing high quality voiceover recordings, without investing too much of a budget.
2 – It’s the most reliable way to make great sounding and repeatable audio recordings.
3 – You can build your homemade recording studio to fit your space and your life, so it never gets in the way.
4 – Building a home studio is the best way to learn about sound and audio production in a risk free, hands on way.
5 – It’s in your home, so when you want to start doing voice work, you can work from home. Yay, it’s the ultimate dream.
Now those all sound like great reasons for building a home studio, but of course we should also quickly go into…
What Are The Downsides of A Homemade Recording Studio?
The downsides can be that it can take a while to tweak a homemade recording studio to make it produce high quality and reliable audio that you want to create, while also fitting into your house and lifestyle. However, once you crack it, the pros of a voiceover home studio far outweigh the cons when it comes to the convenience and savings, both in terms of time and money.
And in the spirit of fairness, let’s also give you 5 reasons why a homemade recording studio can have its downsides.
1 – It could take a lot of troubleshooting to get right, so you might be frustrated by it if you want to start recording perfect quality stuff right away.
2 – A pre-built or custom built home studio booth will sound better than a DIY voice over studio (but those are expensive alternatives).
3 – Creating your own DIY voice over studio will unsurprisingly involve DIY skills, so might be too much of an undertaking for some.
4 – Having a homemade recording studio is only the beginning of the work you need to put into your voiceover career, so it could end up being a waste of time.
5 – Building a home studio will still cost money, so be sure you want to invest in it, or else you will lose money by creating your homemade recording studio.
How To Make A Voiceover Home Studio In 4 Simple Steps
Rome wasn’t built in a day and neither will your homemade recording studio, but unlike Rome, we can nail it down in 4 simple steps. We’re uncertain how many steps it took to build Rome, but we’re confident we’ve beaten it with this guide.
Step 1: Start With A Home Studio Test
So the first objective is to get rid of unwanted noises and find the quietest place that we can before we even begin to think of building a home studio. While there’s little we can do about sound egress (the sound getting out) since we can’t completely soundproof the area, the next best thing is to find the quietest place we can and identify what we need to change to stop noise getting in (sound ingress – now we’re learning!).
Doing a home studio test is the quickest and simplest way to discover your problem spots.
Just follow these steps to do a thorough home studio test.
- Record for 2 minutes with your microphone.
- Set levels to between -3 to -6 db at slightly over-projected dialogue (like you’re talking to friends loudly).
- Record 30 secs of noise floor (background noise of the room) with you outside the room.
- Enter the room and record 30 seconds of you talking into the microphone.
- Then clap your hands near your mic and then around the room comparing noise from around the room. Say where you are situated in the room as you clap.
- The objective is to hear the noise floor and what you need to fix to stop noise getting in. You also want to hear sound reflections around the room and listen to the reverb tail with the claps.
You should do this in multiple places around your house until you find the perfect spot for your DIY voice over studio. Recording the noise floor will tell you how quiet the area is. If you have tried this test in two parts of your house and one is quiet and the other has the sound of a main road outside, then simply pick the quieter one.
The next step is to see how you sound when you’re actually speaking. How much reverb and echo do you get off the walls? How much does the sound reflect?
Finally, the clap test allows you to identify the entire room and where the sound reflections are the worst.
After doing this test, you can pick the best spot in your house and start building a home studio!
Step 2: How To Soundproof A Room For Recording
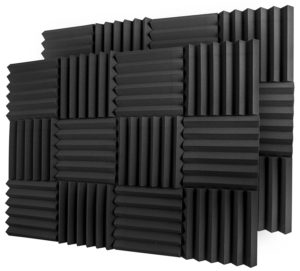 We’ve found a quiet spot, so the sound ingress is as low as possible. Now it’s time to begin deadening the walls and covering all reflective surfaces so we can get rid of the sound reflection and reverb which will ruin your recordings. If you have the budget for it, then buying acoustic tiles are a great way to do this. Good acoustic isolation material will stop any sound reflections right in their tracks and give you a clear sound.
You can even purchase acoustic dividers, which can cordon off an area so you can even adapt the corner of a room into a pseudo-recording booth.
Of course, if acoustic tiles aren’t available or you want to know how to soundproof a room cheaply, then there are lots of cheap alternatives. You can use thick bedding and bits of thick carpet, which will often do the job just as well as home studio soundproofing foam.
The key point is to make sure that you are surrounded by acoustically isolating materials and to cover every hard surface. If you have a desk in your studio and other clutter then remember that this will also reflect noise back into your microphone. If it’s a hard surface, then cover it or get rid of it – it’s a simple rule to follow.
The big things to remember are to remove as many sources of sounds as possible. You’d be surprised how many there are, even after you’ve covered all the hard sound reflecting surfaces and layered the room in studio soundproofing foam
We highly recommend leaving your laptop or PC outside your voiceover home studio. Unless it’s the quietest thing in the world, it is going to add to the noise floor of your homemade recording studio area and ruin your recordings. The best way to deal with this is by running cables outside of the area, so you still have your microphone connected to your audio interface and laptop, but without the noise from either.
You can then leave your monitor in your voiceover home studio to read your scripts from and edit your audio on the fly. With modern tech, this is made even simpler with a wireless mouse and keyboard, so you can use your laptop from a separate screen instead of having it in front of you.
Of course, you can forgo the monitor completely and read your materials from an Ipad or even paper (provided it doesn’t rustle), then you’ve solved that problem as well.
You’d be amazed how much this improves the quality of your recordings.
There are a few things that you will have to accept about building a home studio like this. The biggest issue is that you are still going to have to deal with vibrations and sounds coming from the floor.
In a voiceover home studio booth, you actually design the floor of the booth to be just off the floor of your home to avoid any extra noise or vibrations. But in this case, we’re learning how to turn a room into a recording studio, rather than building an isolated booth. So in this case, you’ll have to lay down carpet or as many sound absorbing materials as possible to lower the impact of this restriction and offer some good homemade recording studio soundproofing.
And the final tip – get LED lights and have some form of ventilation in there. You’ll thank us later when you’re not shorting out your equipment with sweat.
Step 3: Repeat Your Home Studio Test
![]() As you go through the process, keep doing that same home studio test. Keep it as similar to the first time you did it and keep repeating it until all of those sound reflections and background noise have gone away.
As you go through the process, keep doing that same home studio test. Keep it as similar to the first time you did it and keep repeating it until all of those sound reflections and background noise have gone away.
There might be some things you just have to accept about your new homemade recording studio. You may find that even though you get no more sound reflections, every day at 4pm a bus drops kids off outside your house and there’s a lot of noise. Just try to control as much as you can and if it turns out there are certain times you can’t record, learn from it and work around them.
Or keep adapting your DIY voice over studio to fit your needs. It doesn’t have to be perfect the first time, so improve it as obstacles arise.
Step 4: Once You’ve Finished Building A Home Studio, Leave It As It Is!
You may have nailed how to turn a room into a recording studio and adapted your home into the perfect DIY voice over studio, but remember that point earlier about repeatability?
This is a thing which trips up new voice artists all the time. They build a great homemade recording studio, have a great recording session, but when they come back to it, they can’t get the second recording to sound like the first.
Little things can change a lot about your recording, so you really have to make sure that your recording environment is kept the same and your recording quality and sound are both repeatable.
A story I always tell is how one of our members cleverly adapted their closet into a voiceover home studio. It was a great idea! It was compact, quiet and full of clothes which deadened a lot of the reflections right away. But a closet is used daily and by the time a few coats and clothes had been moved around, it was too late. The sound of the room was different.
If you are going to produce a DIY voice over studio in an area of your house, remember to leave it alone and keep it as consistent as possible or else you’ll lose all your hard work.
Be Inspired And Don’t Forget To Get Creative!
The fact of the matter is, that while there’s good rules to follow and things you need to achieve, there are a thousand ways to adapt parts of your house into a homemade recording studio. It’s all smoke and mirrors and if it walks and talks like a functioning voiceover home studio, then that’s what it is.
It doesn’t matter if it’s cramped up in a cupboard, or behind the sofa in the corner of a room. If you take the time to learn how to build home studio environments that sound the part and allow you to produce high-quality work which starts getting you voiceover jobs, then it’s a home studio!
Over time, you’ll get the work you need to invest in a better studio, but there’s no time like the present and there’s no excuse not to get started right away.
Some Homemade Recording Studios To Inspire You
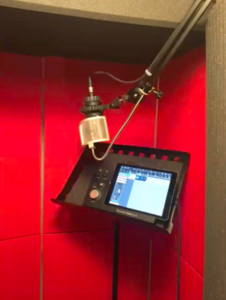
Homemade Recording Studio #1: The Corner
This voice artist has kept it nice and simple. Instead of converting a whole space into a recording area, they have simply found an isolated corner and done some home studio soundprooing on the back wall with acoustic foam.
This is a very cheap alternative as you only have to worry about one aspect of the space. There will still be issues since the rest of the room hasn’t been treated and there could still be lots of noise coming in from elsewhere, but as a starting point, this is great.
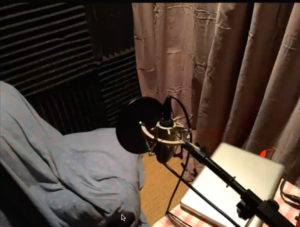
Homemade Recording Studio #2: The Closet Studio
This is a great conversion of a large cupboard or utility area into a DIY voice over studio. As you can see, the voice artist behind this has used acoustic foam on the walls, draped material over the doorway and even used material on any hard spaces.
Using pieces of thick material is a great way to save some money.
The only big issue is having a laptop in the recording space as the fan and any noises from it will be picked up. As always try to have a monitor in the recording space, connected to a laptop or PC outside the recording space for best results.
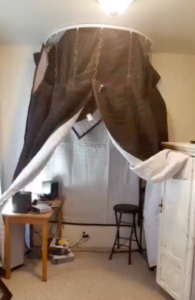
Homemade Recording Studio #3: The Pack Up Studio
Now this is how to build a home studio you can be proud of!
The creative mind behind this has done some great forethought and planning. Firstly, they’ve focused on using thick sheets, curtains and blankets for their acoustics and soundproofing, which is a great money saver.
They’ve also put their DIY skills into installing a curtain rail, which allows them to free up space in the room from the studio if they need to. They can pack it away and bring it back out, confident that it’ll all sound the same for every recording session. Great work!

Leave a Reply
You must be logged in to post a comment.